資訊專(zhuān)欄INFORMATION COLUMN

matplotlib作為一種常見(jiàn)的可視化圖形操作軟件,在日常的生活中應(yīng)用還是比較的廣泛的,下面跟著小編的視角,帶著大家去詳細(xì)解答Python+matplotlib繪制多子圖的方法。
本文速覽
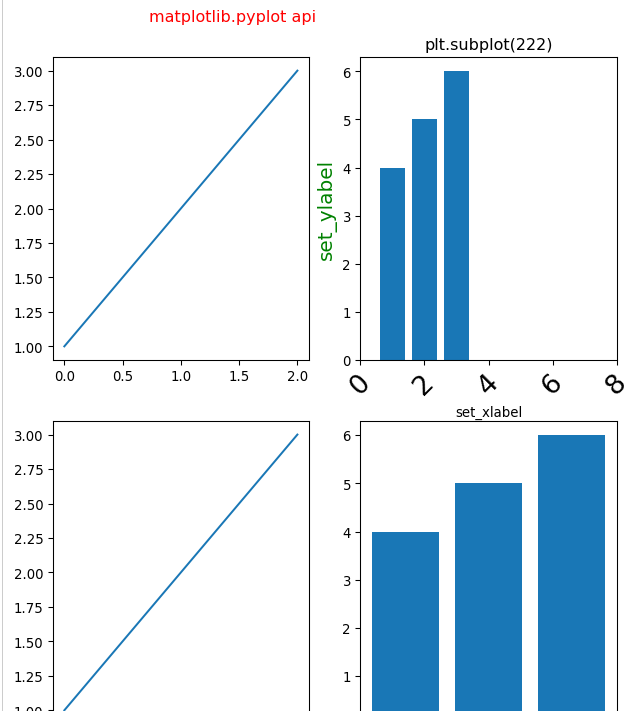
matplotlib.pyplot api繪制子圖
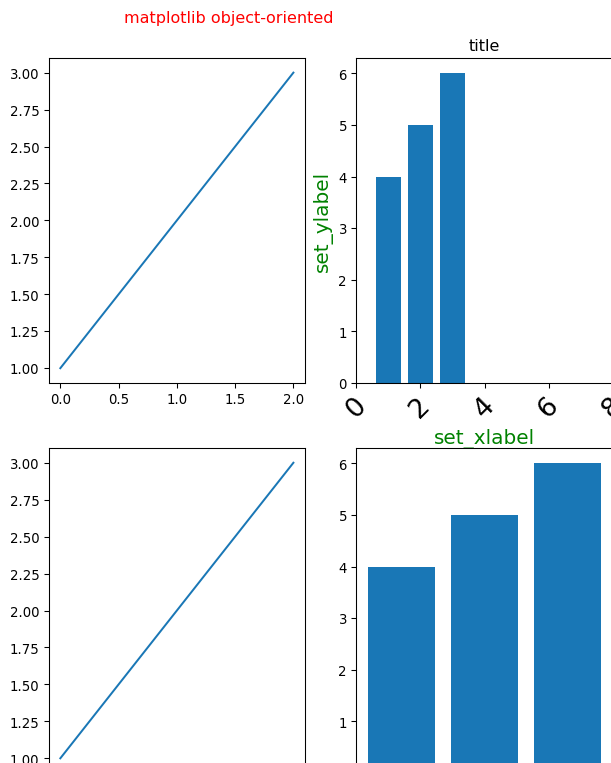
面向?qū)ο蠓绞嚼L制子圖
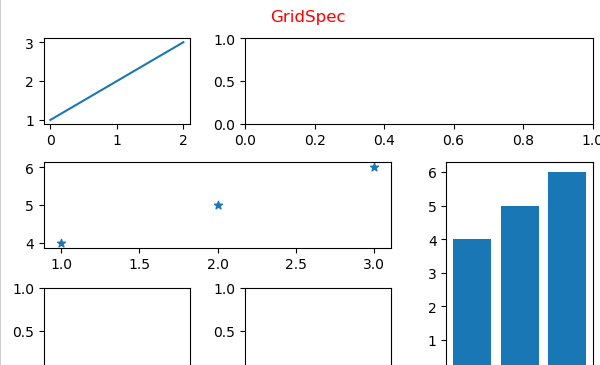
matplotlib.gridspec.GridSpec繪制子圖
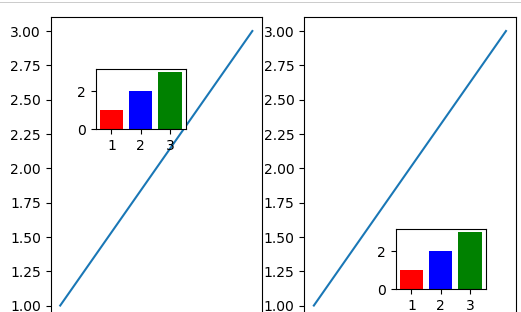
任意位置添加子圖
關(guān)于pyplot和面向?qū)ο髢煞N繪圖方式可參考之前文章:matplotlib.pyplot api verus matplotlib object-oriented
1、matplotlib.pyplot api方式添加子圖
  import matplotlib.pyplot as plt
  my_dpi=96
  plt.figure(figsize=(480/my_dpi,480/my_dpi),dpi=my_dpi)
  plt.subplot(221)
  plt.plot([1,2,3])
  plt.subplot(222)
  plt.bar([1,2,3],[4,5,6])
  plt.title('plt.subplot(222)')#注意比較和上面面向?qū)ο蠓绞降牟町?  plt.xlabel('set_xlabel')
  plt.ylabel('set_ylabel',fontsize=15,color='g')#設(shè)置y軸刻度標(biāo)簽
  plt.xlim(0,8)#設(shè)置x軸刻度范圍
  plt.xticks(range(0,10,2))#設(shè)置x軸刻度間距
  plt.tick_params(axis='x',labelsize=20,rotation=45)#x軸標(biāo)簽旋轉(zhuǎn)、字號(hào)等
  plt.subplot(223)
  plt.plot([1,2,3])
  plt.subplot(224)
  plt.bar([1,2,3],[4,5,6])
  plt.suptitle('matplotlib.pyplot api',color='r')
  fig.tight_layout(rect=(0,0,1,0.9))
  plt.subplots_adjust(left=0.125,
  bottom=-0.51,
  right=1.3,
  top=0.88,
  wspace=0.2,
  hspace=0.2
  )
  #plt.tight_layout()
  plt.show()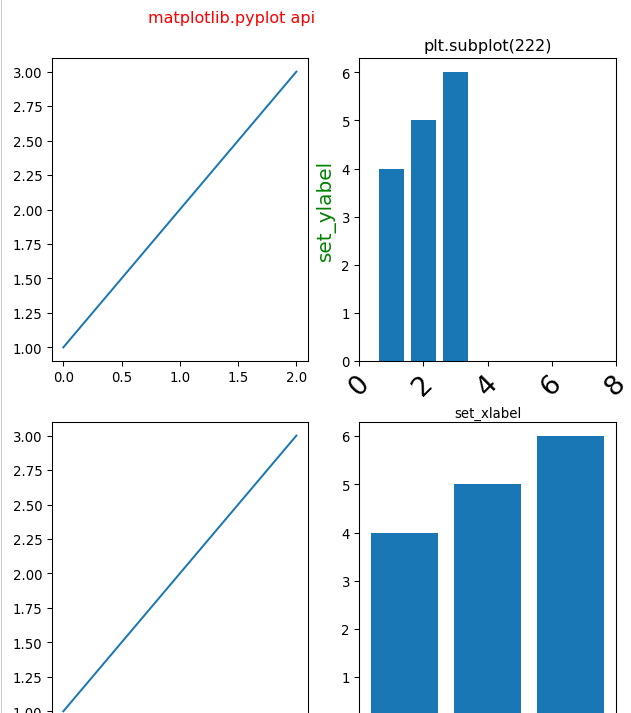
2、面向?qū)ο蠓绞教砑幼訄D
  import matplotlib.pyplot as plt
  my_dpi=96
  fig,axs=plt.subplots(2,2,figsize=(480/my_dpi,480/my_dpi),dpi=my_dpi,
  sharex=False,#x軸刻度值共享開(kāi)啟
  sharey=False,#y軸刻度值共享關(guān)閉
  )
  #fig為matplotlib.figure.Figure對(duì)象
  #axs為matplotlib.axes.Axes,把fig分成2x2的子圖
  axs[0][0].plot([1,2,3])
  axs[0][1].bar([1,2,3],[4,5,6])
  axs[0][1].set(title='title')#設(shè)置axes及子圖標(biāo)題
  axs[0][1].set_xlabel('set_xlabel',fontsize=15,color='g')#設(shè)置x軸刻度標(biāo)簽
  axs[0][1].set_ylabel('set_ylabel',fontsize=15,color='g')#設(shè)置y軸刻度標(biāo)簽
  axs[0][1].set_xlim(0,8)#設(shè)置x軸刻度范圍
  axs[0][1].set_xticks(range(0,10,2))#設(shè)置x軸刻度間距
  axs[0][1].tick_params(axis='x',#可選'y','both'
  labelsize=20,rotation=45)#x軸標(biāo)簽旋轉(zhuǎn)、字號(hào)等
  axs[1][0].plot([1,2,3])
  axs[1][1].bar([1,2,3],[4,5,6])
  fig.suptitle('matplotlib object-oriented',color='r')#設(shè)置fig即整整張圖的標(biāo)題
  #修改子圖在整個(gè)figure中的位置(上下左右)
  plt.subplots_adjust(left=0.125,
  bottom=-0.61,
  right=1.3,#防止右邊子圖y軸標(biāo)題與左邊子圖重疊
  top=0.88,
  wspace=0.2,
  hspace=0.2
  )
  #參數(shù)介紹
  '''
  ##The figure subplot parameters.All dimensions are a fraction of the figure width and height.
  #figure.subplot.left:0.125#the left side of the subplots of the figure
  #figure.subplot.right:0.9#the right side of the subplots of the figure
  #figure.subplot.bottom:0.11#the bottom of the subplots of the figure
  #figure.subplot.top:0.88#the top of the subplots of the figure
  #figure.subplot.wspace:0.2#the amount of width reserved for space between subplots,
  #expressed as a fraction of the average axis width
  #figure.subplot.hspace:0.2#the amount of height reserved for space between subplots,
  #expressed as a fraction of the average axis height
  '''
  plt.show()
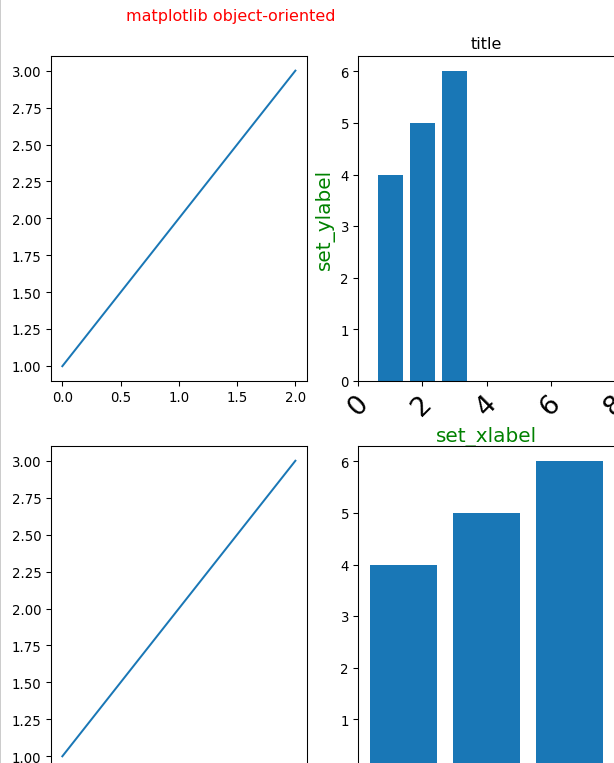
3、matplotlib.pyplot add_subplot方式添加子圖
  my_dpi=96
  fig=plt.figure(figsize=(480/my_dpi,480/my_dpi),dpi=my_dpi)
  fig.add_subplot(221)
  plt.plot([1,2,3])
  fig.add_subplot(222)
  plt.bar([1,2,3],[4,5,6])
  plt.title('fig.add_subplot(222)')
  fig.add_subplot(223)
  plt.plot([1,2,3])
  fig.add_subplot(224)
  plt.bar([1,2,3],[4,5,6])
  plt.suptitle('matplotlib.pyplot api:add_subplot',color='r')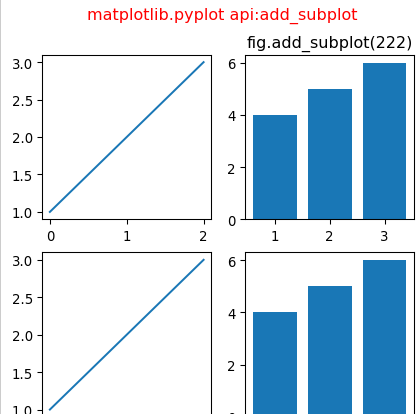
4、matplotlib.gridspec.GridSpec方式添加子圖
語(yǔ)法:matplotlib.gridspec.GridSpec(nrows,ncols,figure=None,left=None,bottom=None,right=None,top=None,wspace=None,hspace=None,width_ratios=None,height_ratios=None)
  import matplotlib.pyplot as plt
  from matplotlib.gridspec import GridSpec
  fig=plt.figure(dpi=100,
  constrained_layout=True,#類(lèi)似于tight_layout,使得各子圖之間的距離自動(dòng)調(diào)整【類(lèi)似excel中行寬根據(jù)內(nèi)容自適應(yīng)】
  )
  gs=GridSpec(3,3,figure=fig)#GridSpec將fiure分為3行3列,每行三個(gè)axes,gs為一個(gè)matplotlib.gridspec.GridSpec對(duì)象,可靈活的切片figure
  ax1=fig.add_subplot(gs[0,0:1])
  plt.plot([1,2,3])
  ax2=fig.add_subplot(gs[0,1:3])#gs[0,0:3]中0選取figure的第一行,0:3選取figure第二列和第三列
  #ax3=fig.add_subplot(gs[1,0:2])
  plt.subplot(gs[1,0:2])#同樣可以使用基于pyplot api的方式
  plt.scatter([1,2,3],[4,5,6],marker='*')
  ax4=fig.add_subplot(gs[1:3,2:3])
  plt.bar([1,2,3],[4,5,6])
  ax5=fig.add_subplot(gs[2,0:1])
  ax6=fig.add_subplot(gs[2,1:2])
  fig.suptitle("GridSpec",color='r')
  plt.show()
5、子圖中繪制子圖
  import matplotlib.pyplot as plt
  import matplotlib.gridspec as gridspec
  def format_axes(fig):
  for i,ax in enumerate(fig.axes):
  ax.text(0.5,0.5,"ax%d"%(i+1),va="center",ha="center")
  ax.tick_params(labelbottom=False,labelleft=False)
  #子圖中再繪制子圖
  fig=plt.figure(dpi=100,
  constrained_layout=True,
  )
  gs0=GridSpec(1,2,figure=fig)#將figure切片為1行2列的兩個(gè)子圖
  gs00=gridspec.GridSpecFromSubplotSpec(3,3,subplot_spec=gs0[0])#將以上第一個(gè)子圖gs0[0]再次切片為3行3列的9個(gè)axes
  #gs0[0]子圖自由切片
  ax1=fig.add_subplot(gs00[:-1,:])
  ax2=fig.add_subplot(gs00[-1,:-1])
  ax3=fig.add_subplot(gs00[-1,-1])
  gs01=gs0[1].subgridspec(3,3)#將以上第二個(gè)子圖gs0[1]再次切片為3行3列的axes
  #gs0[1]子圖自由切片
  ax4=fig.add_subplot(gs01[:,:-1])
  ax5=fig.add_subplot(gs01[:-1,-1])
  ax6=fig.add_subplot(gs01[-1,-1])
  plt.suptitle("GridSpec Inside GridSpec",color='r')
  format_axes(fig)
  plt.show()
  6、任意位置繪制子圖(plt.axes)
  plt.subplots(1,2,dpi=100)
  plt.subplot(121)
  plt.plot([1,2,3])
  plt.subplot(122)
  plt.plot([1,2,3])
  plt.axes([0.7,0.2,0.15,0.15],##[left,bottom,width,height]四個(gè)參數(shù)(fractions of figure)可以非常靈活的調(diào)節(jié)子圖中子圖的位置
  )
  plt.bar([1,2,3],[1,2,3],color=['r','b','g'])
  plt.axes([0.2,0.6,0.15,0.15],
  )
  plt.bar([1,2,3],[1,2,3],color=['r','b','g'])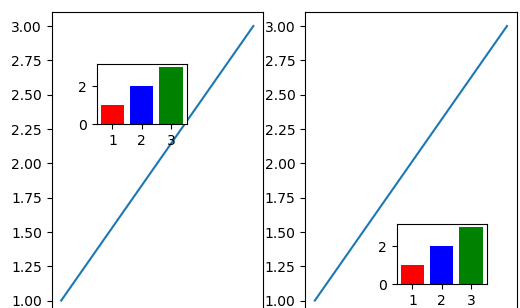
以上就是Python+matplotlib繪制多子圖的方法詳解的詳細(xì)內(nèi)容,希望可以給大家?guī)?lái)幫助。
文章版權(quán)歸作者所有,未經(jīng)允許請(qǐng)勿轉(zhuǎn)載,若此文章存在違規(guī)行為,您可以聯(lián)系管理員刪除。
轉(zhuǎn)載請(qǐng)注明本文地址:http://specialneedsforspecialkids.com/yun/128335.html
小編寫(xiě)這篇文章的一個(gè)主要目的,主要是給大家去做一個(gè)介紹,介紹的內(nèi)容是,利用Python這門(mén)語(yǔ)言,去繪制相關(guān)的數(shù)據(jù)動(dòng)態(tài)圖表,那么,具體的繪制方法是什么呢?下面小編就給大家詳細(xì)的解答。 數(shù)據(jù)動(dòng)態(tài)圖怎么做,效果圖, 多子圖聯(lián)動(dòng)競(jìng)賽圖 安裝 pipinstallpandas_alive #或者 condainstallpandas_alive-cconda-forge 玩起來(lái) 支...
matplotlib作為常見(jiàn)的可視化繪圖工具,在工作當(dāng)中,應(yīng)用還是比較的廣泛的,那么,我們要怎么使用python這門(mén)語(yǔ)言去進(jìn)行繪圖呢?下面就給大家詳細(xì)解答下。 1、matplotlib之父簡(jiǎn)介 matplotlib之父John D.Hunter已經(jīng)去世,他的一生輝煌而短暫,但是他開(kāi)發(fā)的的該開(kāi)源庫(kù)還在繼續(xù)著輝煌。國(guó)內(nèi)介紹的資料太少了,查閱了一番整理如下: 1968出身于美國(guó)的田納西州代爾斯...
摘要:?jiǎn)栴}描述繪制函數(shù)上的點(diǎn),請(qǐng)從以下選項(xiàng)中選出你認(rèn)為正確的答案正確答案第題條形圖的繪制知識(shí)點(diǎn)描述繪制條形圖。 僅需10道題輕松掌握Matplotlib圖形處理 | P...
摘要:直方圖的繪制也需要用到下的,只不過(guò)在繪制折線(xiàn)圖時(shí)我們采用的是,而繪制直方圖時(shí)我們需要采用。利用確定直方圖軸的范圍及間距,為最小值,為最大值,為間距。用繪制,為數(shù)據(jù),為直方圖的特性,可有可無(wú)。 1.直方圖的繪制也需要用到matplotlib下的pylab,只不過(guò)在繪制折線(xiàn)圖時(shí)我們采用的是plot(),而繪制直方圖時(shí)我們需要采用hist()。由于在繪制過(guò)程中缺少真實(shí)數(shù)據(jù),我在這里采用np....
摘要:有一些表示常見(jiàn)圖形的對(duì)象稱(chēng)為塊,完整的集合位于。中的繪圖函數(shù)在中,有行標(biāo)簽列標(biāo)簽分組信息。密度圖通過(guò)計(jì)算可能會(huì)產(chǎn)生觀測(cè)數(shù)據(jù)的連續(xù)概率分布的估計(jì)而產(chǎn)生的。在探索式數(shù)據(jù)分析工作中,同時(shí)觀察一組變量的散布圖是很有意義的。 我們?cè)谏弦黄榻B了 pandas,本篇介紹 matplotlib。 繪圖和可視化 一個(gè)用于創(chuàng)建出版質(zhì)量圖表的桌面繪圖包。 Matplotlib API入門(mén) Figure ...
閱讀 911·2023-01-14 11:38
閱讀 878·2023-01-14 11:04
閱讀 740·2023-01-14 10:48
閱讀 1983·2023-01-14 10:34
閱讀 942·2023-01-14 10:24
閱讀 819·2023-01-14 10:18
閱讀 499·2023-01-14 10:09
閱讀 572·2023-01-14 10:02